The arch virtual machine I’ve used I set up as described in the last two blog posts #1 and #2.
If you are contemplating modifying the flake.nix, home.nix or uv.nix files in the linked github repo, be aware that this may be quite a new type of dragon to ride, even if you have coding experience, and it may take some time to fend off all the errors. It took me some home-manager examples (why are so many of them so complicated?!), diving through forums, and reading up on the nix language to inch my config forward bit by bit. Maybe I’d been faster if I’d done these steps in a different order :P. But I’ve included helpful references in the github repo.
Why did I write this?
Having the config on my virtual machine was nice but then I wanted to use it on macOS and found that actually with some edits, which were only a minor pain compared to figuring out how to add uv :D, the setup worked es well! Also switching from bash on arch to zsh on macOS was super easy. Essentially I could reproduce my setup by 1) install nix, 2) clone repo, 3) minor edits in the nix files for OS specified entries and 4) build and done!
Also, if I want to get rid of a command line tool I just update my home-manager config and swoosh it’s gone, no need to worry which things may need removing anymore, similar for aliases and other command line tool configs.
So all problems solved?
Not quite.
If I want to add a new tool and it’s not one of the packages available out of the box with nix packages one needs to figure out how to install it.
A macOS specifically annoying part is that while GUI tools can be installed the same way as on arch, e.g. add them to home.packages in home.nix, they’ll not be found by Spotlight. But apparently no matter, nix-darwin may help with that. Something to try once the patience recharged. But you don’t need nix-darwin for user home specific setup and command line tools!
In order to get a pretty GUI to interact with we will 1) set up the networking config for the VM and 2) select and install graphics drivers, display server, a desktop environment and a display manager. An outline of the second can also be found here with a range of options for common desktop environments and display managers to choose from.
Let’s dive in!
Setting up the network
Start up VirtualBox, select your VM and click “Start”.
Once Arch is booted up enter root and your password (you have one if you actively set one with passwd previously).
Once logged in as root, let’s test if we have internet acccess, before we can start installing our GUI tools by running
ping archlinux.org
Dang! DNS resolution error. Bummer! Let’s fix that! We need to configure our network and enable / start the relevant services. If you don’t have that error feel free to skip to the next section Graphics things below.
Let’s check the available devices using
ip link
I assume you have a loop and an ethernet device. The ethernet device should be something that starts with “en”, here enp0s3. If you don’t see the “UP” bits run as above run
ip link set enp0s3 up
(you may want to replace enp0s3 with whatever device name you see).
Now let’s enable required services. First get systemd-networkd.service going
systemctl enable systemd-networkd.service
systemctl start systemd-networkd.service
verify that it appears in the list list using
systemctl --type=service
Now let’s do the same for systemd-resolved.service
Since we added / edited a config let’s restart systemd-networkd.service
systemctl restart systemd-networkd.service
Alright, let’s see what our ip route looks like
ip route
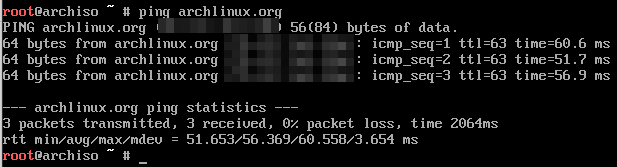
Good! And ping archlinux.org should show something like
The above setup should also be persistent. If you run reboot and log in again ping archlinux.org should still work. Now to what we actually wanted to have, pretty graphics!
Graphics things
For a guide with a range of graphic tool options check out this page.
Okay let’s go. First update pacman
pacman -Syyu
Graphics drivers
According to the docs we want to install virtualbox-guest-utils and activate vboxservice.service. So let’s run
pacman -S virtualbox-guest-utils
systemctl enable vboxservice.service
systemctl start vboxservice.service
Display server
To install the display server run
pacman -S xorg xterm xorg-xinit
To test xorg run
startx
you should see something like
To leave this GUI run
exit
Desktop environment & manager
To install the gnome desktop environment run
pacman -S gnome gnome-extra
and for the gnome desktop manager
pacman -S gdm
systemctl enable gdm
systemctl start gdm
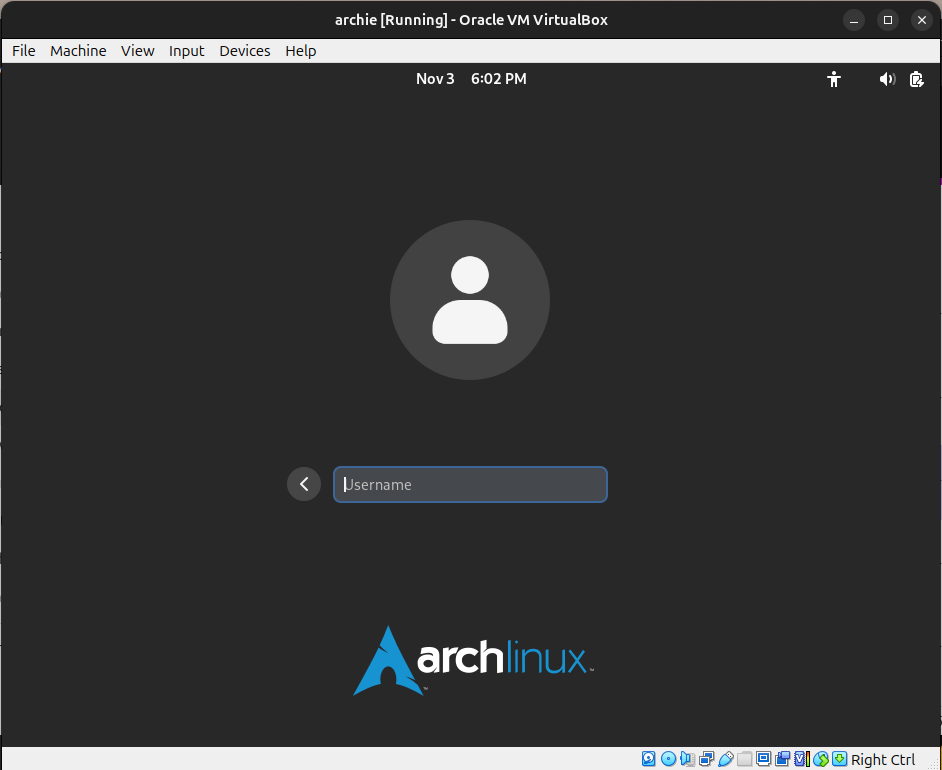
Now some sudden activity should be noticable and the view below should materialize in front of your very eyes
Here enter “root” and the password you’ve set before. Nice! Well done! 🙂
If you want to add another user, e.g. bob, press “opt” / “windows” / “start” key and enter “terminal” in the search. In the terminal run
useradd -m bob
Logging out of the root user you should now be able to log into the user bob, without using any password. If you do want to set a password run passwd in the terminal. 🙂
Conclusion
As Carl Sagan said, if you want pretty graphics you first have to configure networking.
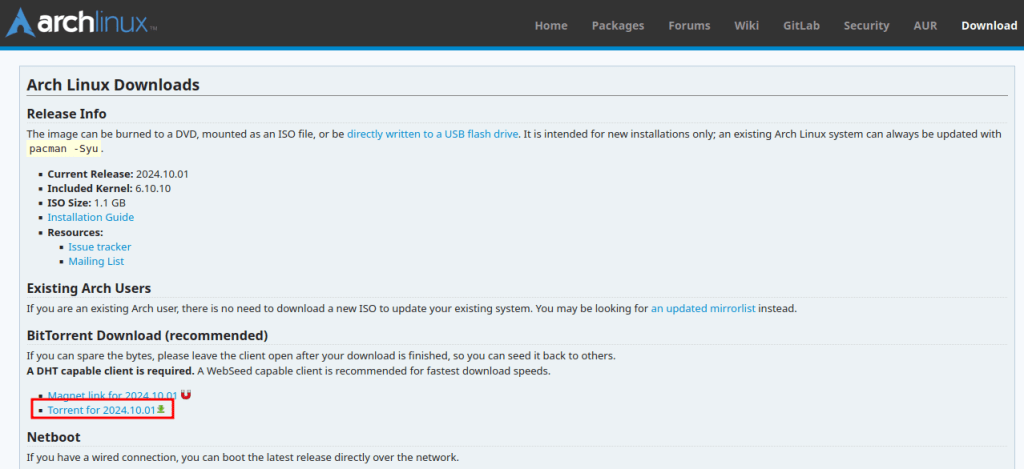
which should show up as something like archlinux-2024.10.01-x86_64.iso.torrent in your ~/Downloads folder.
In order to download the iso install qbittorrent via
sudo apt install qbittorrent
Now you should be able to double click the archlinux-2024.10.01-x86_64.iso.torrent file, starting the qbittorrent graphical user interface. Once your download is completed you should have the file archlinux-2024.10.01-x86_64.isoin ~/Downloads. Now you can terminate qbittorrent as we won’t be needing it anymore.
Create The Arch Linux VM
Start the virtualbox app and click “New”
Select the the archlinux-2024.10.01-x86_64.iso file and choose a name for your VM, I’ll call it “archie”
Select the compute hardware specs and tick the “Enable EFI” box
Set the storage hardware specs
Configure The Arch Linux Guest OS
Now the image should be created. Time to start it and set up the guest OS.
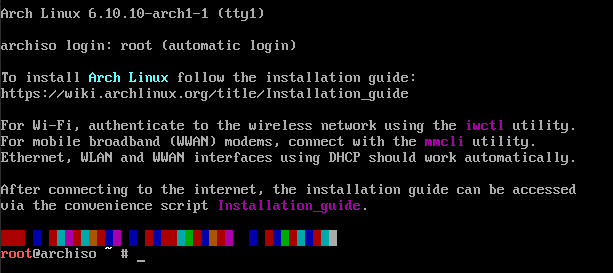
After clicking “Start, a new window will open, you will see 3-4 startup options and a count down, select the first one or just let the counter run out.
Keyboard layout
Now we follow the steps in this guide on installing Arch Linux from 1.5 Set the console keyboard layout and font onwards (only relevant if your keyboard layout is a non-US layout). To list the keymap run
localectl list-keymaps
This seems to enter a vi editor (basic commands) by default. To quit the editor enter :q. To set the keymap run
loadkeys YOURKEYMAP
Boot mode
Enter
cat /sys/firmware/efi/fw_platform_size
mainly to check 1) if the efi/ directory is present (if not you forgot to tick “Enable EFI” in the virtualbox interface (see above). If the directory is present you should get 64 returned and all is good.
Internet sanity check
Do we have internet access? Run
ping archlinux.org
should show something like
and interrupt it at some point with CTRL + C after a few packages were sent, I lost patience at 3 evidently.
Check the time
Run
timedatectl
In my case the time zone is off but the rest is fine. To get the available commands run
timedatectl -h
In my case I want run
timedatectl set-timezone MYZONE/MYCITY
Available values for MYZONE and MYCITY can be found through entering one letter after the other and the Tab key, e.g. producing Europe/London`.
Disk business overview
We want to assign parts of our hard drive reserved for this image to partitions and tell the Arch OS where it can find what.
What we are going to do is create three partitions, assign their types and mount them. The relevant tools are: fdisk, lsblk, mkfs, mwswap, mount and swapon.
In the following table you can see what our setup will look like once we stepped through the upcoming commands
Order created in with fdisk
Partition type
Device identifier
Size
File System Type
Mount point
fdisk Start Sector
fdisk End Sector
1
EFI system partition
/dev/sda1
1 GB
FAT32
/boot
2048
2099202
2
Linux swap
/dev/sda2
4 GB
Swap
swap
2101248
10489858
3
Linux root
/dev/sda3
59 GB (rest)
ext4
/
10491904
134217727
During disk partitioning with fdisk you will be asked from which start sector to which end sector the partition should stretch. A sector, turns out, is span of 512 bytes. So based on this helpful StackExchange post the logic is as follow
So if we want to assign a partition of size 3 GB we would use n_hd = 3 and n_swap = 1 (unless we feel like assigning for for the swap header). The start sector will be suggested to us by fdisk during execution. A full example:
(1 * 1024**3 + 1 * 1024) / 512 + 2048 = 6293506
So our 3GB + 1KB partition would start at sector 2028 and end at 6293506.
Alright let’s do it!
Partitioning the disk
When you run
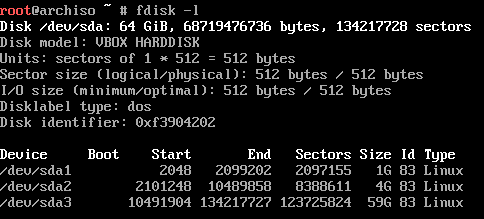
fdisk -l
you should see something like
We will use the device /dev/sda. In case you are curios (what that stands for see here and here) and ignore /dev/loop0.
So let’s start partitioning by running
fdisk /dev/sda
The first partition we want to create is our 1GB EFI system partition.
Type: n, enter, enter, enter, 2099202
The number can be obtained using our logic from above, we calculate the end sector (1 * 1024**3 + 1 * 1024) / 512 + 2048 = 2099202
Onto the 4GB sized swap partition.
Type: n, enter, enter, enter, 10489858
The number of the end sector is obtained using (4 * 1024**3 + 1 * 1024) / 512 + 2101248 = 10489858
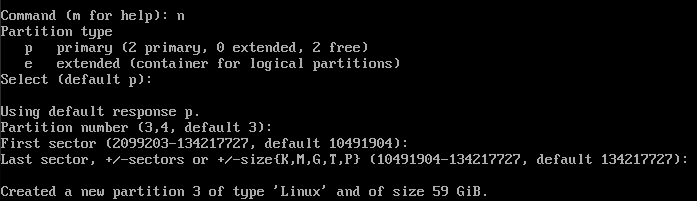
Lastly to our 59GB root partition.
Type: n, enter, enter, enter, enter
Here we don’t need to calcualte the final sector because we just fill up the remaining sectors with out partition.
You are not done!
Type w and press enter to write the table to disk. If you quit without doing that the table you have created is discarded.
To sanity check run
fdisk -l
and you should see something like
If you do not you forgot the w at the end of the fdisk process. But if that happens to you, know the pain is shared.
Formatting The Partitions
Next let’s assign the partition types
First the ext4 type to the root partition (/dev/sda3)
mkfs.ext4 /dev/sda3
then swap to the erm swap partition (/dev/sda2)
mkswap /dev/sda2
and finally FAT32 to the EFI partition (/dev/sda1)
mkfs.fat -F 32 /dev/sda1
Mount The Partitions
Now let’s mount the partitions using
mount /dev/sda3 /mnt
mount --mkdir /dev/sda1 /mnt/boot
swapon /dev/sda2
Install Packages
Now let’s install some helpful packages
pacstrap -K /mnt base linux linux-firmware
Note that this will download ~530MB and may take a few minutes to install after the download.
To set the locale you need a text editor. I prefer vim. So let’s install it. The next lines are a rough guide on what to do to set the US UTF-8 locale.
First install vim with
pacman -S vim
Then use vim to edit
vim /etc/locale.gen
Witihin vim search for “en” by typing
/en + enter
Then switch to insert mode by typing
i
With normal key bindings delete the # in front of en_US.UTF-8 UTF-8. And leave the insert mode using
ctrl + c
To save and exit run
:x + enter
Now run the locale generator using
locale-gen
Write to the locale.conf file using echo "LANG=en_US.UTF-8 >> /etc/locale.conf
Check that the file contains the line we just passed with head /etc/locale.conf
After the locale bit is done let’s do some more random things
echo "KEYMAP=us" >> /etc/vconsole.conf
To check run head /etc/vconsole.conf.
To name your host run echo "YOURFUNKYNAME" >> /etc/hostname
Sometimes running mkinitcpio -P (will take a moment) helps, although apparently not required.
Let’s set the root password so we can log in after the upcoming reboot using
passwd
Boot Loader
Almost done. Now we need to tell the boot loader how to trigger our Arch setup.
First install the efibootmgr tool using
pacman -S efibootmgr
For what’s next we need to know the root UUID. To get the root UUID run head -n 10 /etc/fstab and select the value for /dev/sda3.
Now check presence of vmlinuz-linux and initramfs-linux.img using ls /boot/.
Then let’s create the bootloader entry using
efibootmgr --create --disk /dev/sda --part 1 --label "My Arch Linux Boot Option" --loader /vmlinuz-linux --unicode 'root=UUID=YOURSDA3UUID rw initrd=\initramfs-linux.img'
Now, suddenly, we are pretty much all done. 😛 Enter exit or ctrl + d to leave chroot environment.
Detaching
To verify if we can detach the partitions run
umount -R /mnt
If that was successful run
reboot
Now the vm machine should reboot.
Logging in
If everything worked out correctly you should see the following after the reboot
Here enter root and then use the root password you’ve set above. If that worked you should see the glorious